Monday, October 28, 2019

Pumpkin Hand Pies


Makes ~1 dozen

Ingredients:
1 cup pumpkin puree
1/4 cup sugar + 1 tbs
2 tsp pumpkin pie spice
2 refrigerated pie crusts
1 egg
1 tbs water
Flour for rolling

Special Tools:
Pumpkin cookie cutter*

1. Preheat oven to 400 degrees. Combine pumpkin puree, sugar, and pumpkin pie spice in a small bowl.
2. Roll out pie crust on a lightly floured surface. Cut pumpkin shapes using cookie cutter.** Roll out dough as necessary until 24-26 pumpkins are cut. Place half of the pumpkins on parchment-lined cookie sheets. Cut jack-o-lantern shapes or slits in the other half and set aside.
3. Scoop pumpkin mix onto the pumpkins placed on the cookie sheet--placing in the middle and keeping the mix from touching the edges of the pumpkin. Cover with cut pumpkins.
4. Seal each pumpkin by using a fork to mash the edges together.*** Whisk egg and water together. Brush each pie lightly with mixture. Sprinkle with sugar.
5. Bake in preheated oven for 12-14 minutes. Remove from oven and cool on cookie sheet for 5 minutes. Move to wire rack to finish cooling.

Notes:
*My pumpkin cookie cutter is about 3.5 inches wide.
**I was able to get 6 cuts on one pie crust.
***I used a child's utensil to make it easier to handle.

These are a fun and festive little treat--especially for people whose favorite part of pie is the crust! They are easy to make, but they are a bit time consuming. The issues that I ran into were with the dough. I used store brand dough, and some of my crusts were a little thin--especially after re-rolling the dough a few times. I had a few that cracked since the dough was thin. I may try a different brand or make my own next time. It's also easy to overfill these, so you have to be careful when filling them. They taste amazing and my kids love them! My 3-year-old helped me, so he got to have the first taste. I dusted his with powdered sugar for some extra flair, but it tasted great without it.


Sunday, October 6, 2013

Apple Peel Treats

I used the apple peels from the Fall Apple Crisp recipe to make these "dog treats." I tested them on my friends before I fed them to the dogs though, and both humans and canines were pleased.

What I used:
Apple peels from 8 apples
1 teaspoon cinnamon
a splash of water

What I did:
I preheated the oven to 250 degrees fahrenheit. I had the apple peels in a large mixing bowl and splashed them with water and then coated them with 1 teaspoon of cinnamon.

I lined a cookie sheet with tinfoil and sprayed it with non-stick cooking spray. I spread the peels out in a single layer on the cookie sheet and placed them in the oven.


I baked the peels for an hour before I turned them over and baked for another hour and 1/2. They came out crispier than I thought they would, and they're really tart. The dogs love them, so it's a win. 


Fall Apple Crisp

It's been quite a while since I've posted. My friend Hany asked me last week when I was going to update my blog, so I figured it's time to post. Of course I've been baking--just not blogging. Today I tried a new recipe adapted from one I found on Allrecipes.com. I had a lot of apples from our Community Supported Agriculture (CSA) program and decided I needed to use them before they went bad. There's not much I changed in it to make this recipe my own, but I did add a sweet twist to the apple peels for some tangy dog treats.

What I used:
7 Jonathan Apples Apples (from our CSA)
1 Ida Red Apple (also from CSA)
1 cup white sugar
1 tablespoon flour
1 teaspoon cinnamon
1/2 cup water

1 cup quick oats
1 cup flour
1 cup light brown sugar
1/4 teaspoon baking soda
1/4 teaspoon baking powder
1/2 cup butter

What I did:
First I peeled, cored, and sliced the apples. Then I layered the apples slices in a 13x9" pan. *I saved the apple peels and set them aside for a later recipe.

I preheated the oven to 350 degrees fahrenheit. Next I combined the 1 cup white sugar with 1 tablespoon flour and 1 teaspoon cinnamon. I sprinkled that evenly over the layer of apples and then poured the 1/2 cup water over the apples.


Finally I made the crumb topping by combining the 1 cup oats, 1 cup flour, 1 cup light brown sugar, 1/4 teaspoon baking soda, and 1/4 teaspoon baking powder. After mixing, I had to go back and make sure that there were no sugar clumps. Then I melted the 1/2 cup butter and mixed that into the oat mixture until the entire mixture was crumby. 


I spread the crumb topping over the sugared apples and then dashed cinnamon and nutmeg before placing in the oven.

I baked the crisp for 45 minutes and it came out amazing!


Wednesday, October 10, 2012

Pumpkin Brownies

I love pumpkin! I've heard that you can use pumpkin instead of oil and eggs in a lot of baked goods, so the past few weeks I've been giving it a try. It started with pumpkin muffins (1 can pumpkin + 1 box yellow cake mix), and those came out pretty good--just really thick.

Last night I decided to give pumpkin brownies a try.

What I used:

1 can pumpkin
1 box Ghiradelli (it's what I had) brownie mix
4 tbs milk

Frosting:
2 cups confectioner's sugar
1/2 cup butter spread
2 tsp cinnamon
2 tsp vanilla

How I did it:

I preheated the oven to 325 degrees. I decided to make thick brownies, so I sprayed an 8"x8" pan with cooking spray.

I combined the brownie mix, pumpkin, and milk in a large bowl and mixed it by hand. After the pumpkin was mixed in well enough, I poured the batter into the sprayed pan and baked it for 50 minutes.

After the brownies cooled (and Justin and I had a few samples), I made the cinnamon frosting. I used a hand mixer to cream the sugar and butter. I added the cinnamon and vanilla and mixed it a little more. Because I used butter spread, I could still taste a buttery taste, so I added a bit more sugar, vanilla and cinnamon. If you used regular butter, you wouldn't have that problem.

Justin asked if I'd leave the frosting on the side so the brownies wouldn't get mushy. For the sake of avoiding an argument, I agreed. The brownies taste good without the frosting, but they taste "like a dessert" (as Justin said) with the frosting. I love pumpkin, so these give me exactly the kind of Fall desert I am looking for! They're still really thick brownies even though I added milk, so they're really filling. I recommend them for dinner...or breakfast...or both.

Sunday, August 26, 2012

Back to the blog--Apple Pie Tartelettes


Let me start off by saying that I wish I would have planned this out better. It's 90 degrees in my house right now due to the failure of our air conditioner on Friday afternoon. I've been wanting to make these tartelettes for some time now, but I waited until I got enough apples in our CSA basket. This summer has been so busy. We moved to a bigger house (with an awesome kitchen), but with the moving, cleaning, and vacationing all summer, I haven't had any time to bake! (On a side note, I did notice that I never published my memorial day post--so I just officially published it today).

Apple Pie Tartelettes

What I used:
9 green apples -- peeled and cut into small cubes
12 tablespoons flour
1 1/2 cups white sugar
1/2 cup light brown sugar
4 teaspoons cinnamon
1/2 teaspoon nutmeg

Pie crusts (adapted from the Crisco recipe)
4 cups flour
2 teaspoons salt
1 1/2 cups vegetable shortening
14 tablespoons water

How I did it:

Again, I should have planned better. I didn't take any pictures of my process this time--blame it on being out of practice with blogging, I guess. I did find this recipe on Pinterest though, and the original blogger has pictures of her process. I was really excited to use cupcake tins to make these mini-pies because it sort of combines my two loves.

I started out by peeling and slicing the apples. It was time consuming, and I wished I would have make the crusts first because the apples were starting to brown shortly after I cut them. I set the apples aside and went to work on the crusts.

I couldn't find the pie crust recipe that I usually use, but the Crisco recipe was very similar so I just used that. I started off making just one double crust batch, but I quickly realized that it wasn't going to be enough. I combined 2 cups of flour with 1 teaspoon of salt and cut in 3/4 cup vegetable shortening with a hand mixer. I added 8 tablespoons of water (2 tablespoons at a time) and mixed it in with a fork until it was all stuck together without being too mushy. I rolled it out with a rolling pin and used a large cup lid to make circular cuts in the dough for my bottom crusts. I should have just sized what I needed and cut the dough by hand because the cupcake tin was too deep and the dough didn't reach all the way to the top. After I filled one tin (12 tartelettes), I realized that I wasn't going to have enough dough.

I decided to just make the tartelettes in two batches because I needed to make more dough for the crust, so I moved on to make the apple filling and finish the first batch. Before I started mixing the apples with the sugar, I preheated the oven to 400 degrees. I decided to use the pie oven (yes, I have a pie oven in my new house and I love it) because it was so hot in the house, and I knew that I'd have to bake the 2 trays of tartelettes separately anyway.

I took the 8 cups of chopped apples and added the flour, sugars, cinnamon, and nutmeg. I mixed it all together and filled my first batch of tartelette pie crusts.

After I wove the tops of the first batch of tartelettes with dough, I spread a little melted butter on them and topped them with sugar. I popped them in the oven for 24 minutes--checking periodically to make sure they weren't burning.

While my first 12 were in the oven, I made the second batch of dough for the crusts--except this time I only had to use 6 tablespoons of water. I filled the second batch tins (2 tins--6 cakes each) and waited until the first batch came out of the oven. I put the second batch in and let those bake for 24 minutes.

I let all of the tartelettes cool before removing them from the tins. Only 2 fell apart because the bottom crust wasn't thick enough to support the weight of the apples and the top crust--I consider that a success for the first time I bake a new recipe! They still tasted good. I just put them in a bowl & shared them with Justin.


Rating:

These are delicious little tartelettes! They are rather time consuming because you have to shape each individual crust, and some of the crusts were having a hard time staying attached after I took them out of the tins. I would definitely make them instead of making a traditional pie if I was going to a gathering. They're much easier to pick up than pie and require no cutting. I'd like to try a different fruit next time--maybe strawberries or blueberries. I'll have to find a better way for the top crusts to stay on top too.

Now I'll have to run out and get some ice cream to go with these...

Memorial Day Trifle

The colors of the fruit on this trifle make it perfect for any American holiday.

Pound Cake:


Trifle:


Sunday, April 29, 2012

Strawberry Pie


This is Justin's favorite! It all started a year and a half ago--Justin's birthday is in late November, and I asked what kind of cake he wanted for his birthday. He asked if he could have strawberry rhubarb pie instead. I found a recipe and started to gather the ingredients. After a few trips to various grocery stores, I could not find rhubarb anywhere. I still wanted to try to make a strawberry pie using the ingredients I had already bought, but I needed to find a new recipe. I went straight to Allrecipes and found this recipe. I decided I'd try it. I always use the same crust recipe, so I was ready to go!


I've made this pie half a dozen times since then. It's a tasty summer pie, and everyone loves it! We got strawberries in our CSA (community supported agriculture) basket this week, so this pie had to be made.


What I used for the crust*:
2 cups flour
1 teaspoon salt
2/3 cup shortening
6 tablespoons water


*this is a recipe for a double crust pie


What I used for the pie:
Approximately 4 cups sliced strawberries (I only had about 3 1/2)
1/4 cup granulated sugar
1/2 cup light brown sugar
1/2 cup flour
1 tablespoon cornstarch
1 teaspoon cinnamon
1/2 teaspoon nutmeg
1 tablespoon vanilla extract
1/2 teaspoon almond extract
Approximately 2 tablespoons butter (I used margarine)
Approximately 2 tablespoons milk
Approximately 2 teaspoons granulated sugar


How I did it:
I preheated the oven to 425 degrees and got right to work on making the crust. I've made this crust before, so I know that everything has to be exact for it to come out right. I combined the flour and salt in a large bowl. After giving that a quick mix, I added the 2/3 cup shortening. I used a hand mixer to create a crumble out of the mixture. The next step is the most important: I added 6 tablespoon of water to the mixture--one tablespoon at a time. I fluffed the mixture with a fork after each water addition. If you do this wrong, the dough comes out too powdery or too sticky. This time I needed to add 1/2 tablespoon more water to make it right. After adding the water and getting it right, I formed the dough into a ball. I divided the large dough ball into two smaller balls (bottom crust and top crust).


I took my first dough ball and rolled it out with a rolling pin. I always put flour on the countertop so that the crust won't stick.


After rolling out the dough enough so that it would cover my entire pie plate, I carefully picked it up and moved it to the pie plate. You can see that I had to push down and move the crust a little after I put it on the plate. It's really important to make sure that the crust comes all the way to the top of the plate because the top crust needs to meet the bottom one when you seal it. 


I set the pie plate and crusts aside while I worked on the pie filling. I had already sliced the strawberries, so I just had to get the sugar mixture together. I combined the granulated sugar, brown sugar, flour, cornstarch, cinnamon, nutmeg, vanilla extract, and almond extract together in a large bowl. The extracts kind of clump a little bit in the sugar, so I just go through and break them up with a spoon.


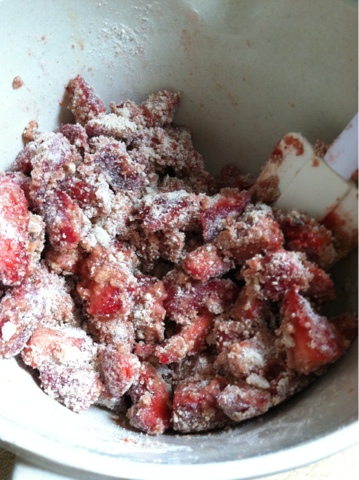
Once the sugar mix was less clumpy, I added the strawberries and coated them with the mixture. It is so tempting to pick one of them up and eat it, but I resisted this time!


I poured the sugary strawberries into the crusted pie plate. I mounded the strawberries in the middle a little bit because they spread to the sides while the pie is baking, so it winds up evening the pie out. After I poured the strawberries in, I set the pie plate aside to work on the top crust.

I rolled out the other dough ball on the counter (again--using flour on the counter to keep the dough from sticking). Usually I cut the dough into long strips and lattice it myself, but Justin bought me a quick-lattice maker for Christmas that I hadn't used yet. I just placed the quick-lattice maker on the dough, and it cut the squares into the dough for me. The only problem is the squares don't come out when I pull the cutter off. I had to pick the little squares out with my fingers. Slightly tedious, but it didn't take me too long.

I slid the lattice crust onto the top of the pie. I placed a dab of butter into each opening. I also brushed the crust with milk and sprinkled a bit of sugar on it to make it golden during baking.


I placed my crust shield on the pie (another Christmas gift from Justin) and popped it in the 425 degree oven for 40 minutes. It turned out just right!


Rating:
Our friend Andrew was over for dinner, so he had a piece of strawberry pie for dessert. Andrew isn't big on sweets, but he really enjoyed this. It's a winner!

The first time I had it, I didn't think I liked the almond flavor, but it has really grown on me. I've considered omitting it, but Justin says that's one of his favorite parts. If you're not big on almond, you could add less or omit it completely. The pie would still be heavenly!


Warning: following this recipe will result in a messy kitchen! And maybe an expanded waistline!